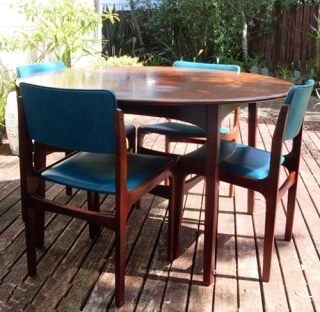
As you may know, I decided that it would be a genius idea to buy a second hand, extremely damaged, veneer dining suite from Trade Me and attempt to restore it to a non-cringeworthy standard. I sorta only halfway got there as I couldn’t be arsed sanding down the whole table, so just worked on the top as that was the bit that was worst. And now the top is gloss and the rest is errrr… not gloss. Now I look at the chairs and the table legs and it makes me cringe. Damnit.
Unfortunately I don’t have any proper shots of the table in the before and during stages, though I did find this one from Trade Me when I bought it. It kinda shows the state that the table top was in. Bear in mind that I did a whole lot more damage to it when I got it home and dragged it off the trailer and into the house by myself because I was too excited to wait until the Boy got home.
So this is before. The chairs are crap too but at least a smidgeon better than the table was. I’ll deal with them at some point. In the during part of this DIY bizzo, I researched the shit out of how to restore veneer furniture without destroying it and the consensus was that you can do it, but you need to be really careful sanding it back. I’m not sure I followed all the rules right, and I managed to break Dion’s sander in the process, but I did a passable job for a newbie to this business. I sanded until I got sick of it removed all the most of the cracked and damaged polyurethane and previous stain. Then I gave it a coat of a mostly matching stain (I had to take a guess at the shop), and then two coats of polyurethane. Totally forgot to sand it down between coats. Oops. And apparently I used cheap brushes because they left a zillion bristles behind in the polyurethane. If I ever find out who labelled those brushes with “No bristle loss” then I’m gonna punch them in the face.
And after all that, this is how it looks…
I’m not taking photos up close because then you’ll see how badly the chairs and table legs need doing. heh. It definitely looks 100% better than it did when I started though so I’m really stoked. The only problem is that there are a couple of short cuts I took and now they bug the shit outta me. I got sick of sanding and so there are a couple of patches on the table which are slightly darker. And also someone must’ve used putty on the table before, as when I was sanding back, it uncovered a couple of white patches along the centre where the table extends. I should have gone back to the shop and got some matching putty to recolour the patches but I just wanted to move on to the next step so I pretended they didn’t exist. They did. And they do. And now they are glaringly obvious to me. Argh.
We’ve been eating dinner almost every night at my new dining table and I really love it. Now I just can’t wait to get a house of our own to put it in! House Quest 2011 begins.


I've said it before….come to Chch – lots more house, less $$$. Wicked table. E xx
LikeLike
Part way through reading this post i was quite impressed (with help of your strategic photography), but then you ruined it all by detailing your efforts. You may as well of given me the humour of the close up detailed shots in the first place!!!
Anyho. I think your quite clever. 1) You've embedded a noodle story into that table top.
2) Its finished! (for now)
3) It looks brand spankas from here (Wellington NZ)
Cant wait to see what you do to a whole house. In fact. I'm scared at the thought.
LikeLike
Nix, thanks for the post, table looks great, well impressed at the effort! cant see any of hte problems you mentioned in the picture either! wonderful!
p.s loved the post about D! too cute.
LikeLike
Holy heck – this is brilliant! Would love to see pics of rest of your house (actually I quite liked it before too) but it looks amazing now- what a score. You are very clever. I am horribly lazy and have never finished anything since my macrame plant holder in Form 1(which I didn't finish…)Have a great weekend
LikeLike
That bottom pic looks so cool. At first I thought it was a pic of a dolls house. Is that really your house?
Maybe I'm just a Brit used to living in a dark shoebox. 🙂
LikeLike